
Customer Care
Warranty Process
We Hope you are pleased with your new home from Brighton. We know that you may have questions about your new home, so we have provided some information to make it easy for you to find what you need, or to contact Our Customer Care Team for assistance please email them using the community specific email given to you or fill out the contact form below.
Customer Care Timeline
Get Move-In Ready
(30 Days from Closing)
For the first 30 days after closing, we will make adjustments to the plumbing system as necessary to correct dripping faucets, clogged drains, running toilets, and similar issues.
Workmanship Warranty
(1 Year from Closing)
For a period of one year from closing, we warrant that your home will be free from defects in construction. A defect is an element of your home that doesn’t comply with applicable building codes, manufacturer performance guidelines, or the performance guidelines set forth in the NAHB Residential Construction Performance Guidelines. At 10 months after closing, expect an email from us to initiate your 1 year items (if any)
Systems Warranty
(2 Years from Closing)
For a period of 2 years from closing, we warrant that the plumbing, electrical and interior climate control systems will be free from defects in construction.
Structural Warranty
(3 Years from Closing)
For a period of 3 years from closing, we warrant that load-bearing structural elements of the home (roof framing, beams, columns, foundations and load-bearing walls) caused by failure of such load- bearing elements which affect their load-bearing functions to the extent that the home becomes unsafe, unsanitary or otherwise unlivable.
Log into the Customer Care Portal
Homecare & Maintenance
Brighton Homes strives to create and maintain long-lasting relationships with our homeowners. Outstanding Customer care is a prime example of that dedication. We hope that these documents and videos assist you in caring for your home.
Home Care & Maintenance Guides
APPLIANCES
Register Your Bosch Appliances
Go to: http://www.bosch-home.com/us/mybosch
1) Create a MyBosch account by clicking on CREATE an Account
2) Once logged in, click on REGISTER HERE.
3) Fill in the short form to register your products
- Once logged in, click on REGISTER HERE.
- Fill in the short form to register your products.
FAQs, Owner Manuals, Cleaning Tips, and Troubleshooting
Service – Get Support | Bosch Home Appliances (bosch-home.com)
Appliance Tips and Tricks Videos
How–To Videos | Bosch (bosch-home.com)
How to Schedule Bosch Repairs
Servicer Finder | Bosch (bosch-home.com)
Call Bosch
Call 1-800-944-2904
CABINETS
Cabinets are one of the first things people notice about your kitchen or bathroom. Proper maintenance is the secret to keeping your room cabinets looking and working great kitchen and bat. Clean your kitchen cabinets regularly to help extend their life for appearance and functionality.
Care and Cleaning Do’s and Don’ts
Choosing the correct type of cleaning cloth is important. The best choice is a lint-free soft cloth such as a cloth made from soft cotton fabrics, cheesecloth, or chamois. An old t-shirt works well!
When cleaning your cabinets, use natural products that won’t scratch the cabinet finish or leave sticky residues. Mild, grease-cutting hand-washing dish soap makes an ideal cabinet cleaner. For those greasy spots, try spritzing straight lemon juice onto the area. It’s a natural degreaser. Give it some time to work before rinsing it off.
While mild soap and water is the preferred solution for cleaning all kitchen cabinet types and finishes, too much moisture or standing water is the biggest enemy of wood and wood finishes. For the best results, apply a mixture of soap and water using a soft cloth. Then, rinse the cabinet with clean, fresh water using a second clean cloth to remove detergent residue. Finally, use a third clean, dry cloth to dry the cabinet immediately to avoid water damage.
**Immediately clean up any spills, splatters, or water spots with a soft cloth to avoid damage to your cabinet or wood finish***
Adjustments
Normal everyday opening and closing of cabinet doors can, over time, cause the doors to shift slightly. This may require a minor door hinge adjustment to bring your door back into perfect alignment. There are three basic adjustments you can make with a simple turn of a screwdriver.
In and out. This adjusts how the cabinet door rests in the closed position and how it strikes the face frame as it closes.
1. Use a yardstick or another long straight edge to check doors for tilt. Position the narrow edge of the straight edge against the door, spanning more than one, and look along it to find the uneven doors.
2. Open the door and locate the adjustment screws in both cabinet door hinges.
3. Turn the screw clockwise to draw the door in and counterclockwise to push it out.
4. Close the door and recheck with your straight edge.
5. Adjust as needed until doors sit evenly
Up and down. This is primarily a visual alignment for doors in a long line or pair. It allows you to adjust the height to match other doors.
1. Locate the top screw on the mounting plate, turn it clockwise to raise the door, and counterclockwise to lower it. Start with a quarter turn, then do the same at the bottom hinge.
2. On doors without “Cam” action screws, loosen the plate adjustment screw, adjust the door and tighten.
3. Close the door to check alignment.
4. Continue adjusting, alternating top and bottom hinges as you go until the door is aligned.
Right and left: this is the adjustment that most affects the smooth operation of your doors. By adjusting the upper or lower hinge or both hinges in tandem, you can tilt the door for alignment of the “reveal” (space between doors).
1. Locate the side adjustment screw at the hinge you want to start with. The side adjustment screw is located on the cabinet side hinge plate, closest to the door. Or on an edge mount hinge on the edge of the cabinet frame.
2. Use the screwdriver to turn the screw clockwise to move the door toward the hinge and counterclockwise to move it away.
3. Continue adjusting until the door aligns. Adjust both screws evenly to move it right or left for doors that are not tilted.
4. Adjust the second hinge if needed.
COUNTERTOPS
Granite (Natural Stone)
Granite requires minimal maintenance to keep it looking brand new. Besides an everyday wipe down to keep it clean, you’ll need to ensure the granite is sealed periodically.
Everyday General Maintenance Information
Wipe down with a microfiber cloth and use warm water with a small amount of dish soap as needed.
Occasionally wipe down the stone with a damp cloth and stone cleaner with a neutral pH. (These can be found at most hardware and grocery stores)
For tough stains, try a poultice of a cup of baking soda and five tablespoons of dish soap. Add water to make it the consistency of sour cream or yogurt. Apply to stain, cover with plastic wrap and leave overnight before washing off.
Sealing Granite or Natural Stone
Granite is moisture resistant. However, it is also porous, allowing most liquids to seep into the stone. A properly sealed countertop will cause those liquids to bead on top of the material, allowing you to clean and protect the stone.
Your granite countertop was sealed by the manufacturer before installation. That sealant is typically good for one year of regular daily use. Generally, it would be best to seal most kitchen granite countertops once a year. That can change depending on the sealer you choose to use.
To determine if it’s time to reseal a countertop, dribble some water in a high-use area onto the countertop. If it beads up, great; if the water soaks into the granite, it’s time to reseal.
Sealing granite is easy and something all homeowners can tackle themselves. Most applications spray on, sit, then wipe off. Granite sealers can be found at most hardware stores. Follow the manufactures directions for the sealer you choose.
Quartz
Quartz countertops are beautiful, durable, and easy to take care of. They are manufactured and stain-resistant, unlike granite or marble. Here are a few tips to keep your quartz beautiful.
• Use a non-abrasive sponge or dishcloth with warm water.
• A PH-neutral liquid cleaner or dishwashing liquid with warm water can be used for greasy areas or stains (always immediately clean up substances that can stain).
• It isn’t necessary to seal quartz countertops, as they are not porous like granite.
• Set any crock pots, fryers, pans, etc., on a hot pad or trivet before placing these hot items on the quartz.
• DON’T USE abrasive sponges or abrasive cleaning products and avoid contact with acetone, anything containing hydrofluoric acid, ammonia, methylene chloride, trichloroethylene, or products with very high or low PH.
Laminate
• Use a soft sponge or cloth with warm water.
• Ordinary dishwashing soap can be used for cleanup.
• DON’T USE abrasive pads, cleaners, or Magic Erasers.
No matter the type of countertop you have in your home, there are a few things NOT to do to avoid damaging its surface
• Do not put hot cookware directly on the surface. The use of hot pads and trivets is always recommended
• Do not cut with knives directly on the surface. The use of a cutting board is always recommended.
• Do not stand on the surface. Countertops are not fracture-proof. The use of a step stool or ladder is always recommended.
• Do not use cleaners that may be abrasive, strong alkaline, acid, free radical, or oxidized. Various chemicals are corrosive in their ability to attack any countertop.
Francini Marble – General Care and Maintenance
Click to Download PDF File
![]()
ELECTRICAL
Circuit Breaker Box
The circuit breaker box holds the circuit breakers for the electrical system. Circuit breakers look like switches and are designed to shut off power to some or all of your home and limit the amount of power flowing through a circuit.
How to Reset a Breaker – YouTube
ARC Fault Breakers
All bedroom power-using devices (lights, smoke detectors, receptacles, etc.) are protected by ARC Faults. The ARC Fault breakers are located in the electrical panel in your garage.
Siemens Combination Arc Fault Circuit Interrupter – YouTube
Ground Fault Interrupters (GFCI)
Ground Fault Circuit Interrupters are made to shut off electrical current to outlet(s) to prevent electrical shock. These are used in wet areas, such as bathrooms, kitchens, garages, and home exteriors. One of the GFCI outlets in the circuit includes a small reset button that controls all circuits in the outlet.
Please note freezers or refrigerators may cause tripping of GFCIs. Review your appliance manufacturer recommendations for more details.
How to test a GFCI Device | Leviton – YouTube
Honeywell Digital Whole House Ventilation Fan Control Switch
The whole house ventilation fan control can be found in a bathroom or laundry room.
A steady flow of clean air in a home makes it comfortable and healthy. One of the most important features of an Energy Star home is the ventilation requirement to keep the fresh air flowing. The goal is to provide fresh air and prevent odors, moisture, and pollutants from building up in the home.
Electrical System\Honeywell Digital Bath Fan Control – Owner’s Guide
Click to Download PDF File
![]()
Electrical System\Honeywell Digital Bath Fan Control – Product Overview
Click to Download PDF File
![]()
Low Voltage Utility Electrical Panel
A low-voltage electrical panel is typically located in the laundry room and houses internet, satellite, cable, and phone wires for the interior of the home. These wires are pre-wire only and cannot activate until you contact a service provider to finish the installation and activation of the service.
Ventilation Fans
Broan-Nutone: 110 CFM fan in bathrooms with a shower / 50 CFM fan in other required areas. Click the links below for specifications.
50CFM Fan: 670 (broan-nutone.com)
110 CFM Fan: AE50110DC Broan® Bathroom Exhaust Fan, ENERGY STAR®, 50-110 CFM (Broan-nutone.com)
EXTERIORS
Stucco
Dryvit Stucco Maintenance Guide
Click to Download PDF File
![]()
Manufactured Stone
Technically Speaking | MSV Stone Cleaning – YouTube
Eldorado – Care and Maintenance
Click to Download PDF File
![]()
Manufactured Brick
Eldorado – Care and Maintenance
Click to Download PDF File
![]()
Eldorado – The Impact of Grout
Click to Download PDF File
![]()
Siding
View our collection of sustainable and durable engineered wood siding and trim here: TruWood Siding and Trim
Resources (truwoodsiding.com)
FIREPLACE
Fireplaces have been in homes for as long as homes have been built. In the early day fireplaces were the source of heat for the home. They quickly became a focal gathering place, the hub of the home. While today’s fireplaces are less about heating, they still add beauty, character, and a sense of comfort to your space.
Heatilator Novus 30 IFT Owners Guide
Click to Download PDF File
![]()
Heatilator DV 36 Corner Fireplace Owners Guide
Click to Download PDF File
![]()
Montigo Phenom PL42DF Owners Guide
Click to Download PDF File
![]()
Montigo Fireplace Flush Face Glass Removal
Click to Download PDF File
![]()
Fireplace Care and Cleaning Videos
Cleaning Video
Montigo Cleaning and Care: visit website.
Trouble Shooting Video
FLOORING
Different types of flooring alter the overall look and feel of your home. Whether you have the warmth of hardwood, the durability of tile, or enjoy the cushiony comfort of carpet, each requires different care to maintain. You should expect each type of flooring in your home to react to time, usage, temperature, and humidity. Here’s a quick rundown of general maintenance ideas for each flooring type you may have in your home.
Do you have a spill or stain? Follow the link for cleanup tips. Care | Shaw Floors
Carpet
Carpet – Maintenance (nampafloors.com)
Vacuuming thoroughly and frequently is the most important step in caring for your carpet. Is your vacuum recommended for your carpet? Check out this link to find out: Vacuuming Your Carpet | Shaw Floors
Carpet Cleaning regularly will remove the oily, sticky soils that vacuums can’t take out. This is more than a spot clean. Every 12-18 months, hot water extraction or steam cleaning, will help keep your carpet looking great. Carpet Cleaning | Shaw Floors
Preventative Maintenance such as placing walk-off mats outside, occasionally moving your heavy furniture, and cleaning your area rugs can increase your carpet’s life span while refreshing the feel of your room. Check out these other preventative maintenance ideas: Carpet Preventative Maintenance | Shaw Floors
Engineered Hardwood (Hallmark Novella Flooring)
Use Hallmark cleaning products: These cleaners are designed to clean and maintain Hallmark Floors flooring products. The cleaner depends on your flooring finish (see the Maintenance/Warranty Guide shown below). These may be ordered from Amazon.com.
Do not use unauthorized maintenance products:
Such as oil soaps, paste wax, or other cleaners containing lemon oil, citrus oils, Tung oils, ammonia, or cleaners containing silicone. Do not use two in one cleanser that has acrylics or urethane polish to restore gloss. The use of these products invalidates the product warranty.
Pets: Keep nails well-trimmed and paws free of dirt, gravel, grease, oil, and other staining agents. Wipe up pet urine and waste to prevent stain damage to wood.
Regular Maintenance Dust Removal: Dust and allergens are easily removed with a canister vacuum and soft brush attachment. Removal of dust and grit with regular vacuuming removes these abrasive agents for good long-term performance of the floor. The brush should be replaced as needed to prevent scratching of the floor. Perform as needed (average in the normal household is weekly). NOTE: Do not use treated commercial dust mop or treated dust pads of any kind, as they can contain petroleum-based solvents that can leave a chemical residue on the floor.
Clean Up All Spills: Spills can be cleaned with a moistened, well-wrung-out soft cloth or sponge. Once the spill is removed, spray Hallmark Floors Cleaner on a clean, moist towel to remove all remaining residue. All spills must be cleaned up immediately to prevent damage to the floor.
No Wet Mopping/Steam Cleaners: Do not use string mops, sponge mops, or steam cleaners to clean Hallmark Floors.
Unauthorized Maintenance Products: Do not use two-in-one cleaners or polishes that may contain acrylics or urethane. These products will damage the finish and invalidate the factory warranty.
Dent/Scratch Prevention: Wood flooring is susceptible to dents and scratches. Cloth glides must be applied to the chair and furniture legs. Double barrel coaster wheels should replace hard rubber or metal wheels.
Follow the guidelines below for maintenance:
Hallmark Hardwood Flooring Maintenance & Warranty – NU OIL
Click to Download PDF File
![]()
Hallmark Hardwood Flooring Maintenance & Warranty – TRUEMARK® POLY & TRUEMARK® GLAZE TEK
Click to Download PDF File
![]()
Hardwood (Oak) Do’s and Don’ts
Hardwood has many various woodgrains and colors because it is a natural product. No two boards on a floor are the same. These variations create warmth and beauty on the floor. Like most natural products, they react to the environment they are in. They can expand and contract with fluctuations in temperature and humidity. Don’t be surprised if you see a new crack or shift in the floor that wasn’t there the day before!
DO’s
• Clean up spills quickly
• Vacuum or dust mop frequently and thoroughly
• Wet mop floors weekly with the Bona Wood Floor Cleaning System
• Place mats or rugs near doorways and in high-traffic pathways (Is your rug intended for hardwood?)
• Use protective pads on chairs and furniture
• Trim your pet’s claws to help avoid scratches on the floor
DON’Ts
• Excess / standing water or liquid on the floor can cause boards to swell and require replacement.
• Be mindful of normal splash zones on the hardwood (in front of the kitchen sink, dishwasher, refrigerator, or under sitting areas)
• Hardwood can indent with high-heel use.
• Using the wrong cleaning products can damage the finish and void your floor’s warranty (we recommend Bona flooring cleaner).
• Be careful not to drag furniture across the floor – this may damage the finish.
Check out these additional hardwood tips and tricks:
Bona Floor Care Instructions
Click to Download PDF File
![]()
Tile
Use a grout sealer on grout joints and natural stone to prevent staining and make cleaning a breeze.
Read labels of cleaners to ensure they note they “will not discolor the grout.” Neutral cleaners will not affect the cement properties in the grout.
Don’t use cleaners that contain color on the unglazed tile as the tile is porous, and color from the cleaner may transfer to the tile.
Be careful with scouring pads and powders (test first), as they may scratch the surface.
Vinyl
Sweep or dust daily.
Wash and rinse weekly using cleaning products safe for vinyl flooring.
Use floor protectors on chairs and table legs.
Don’t use rubber or latex-backed mats that may discolor your flooring.
Sliding appliances across the flooring may damage the vinyl.
High heels can leave permanent dents in vinyl flooring.
GARAGE DOOR & OPENER
Lift Master Garage Door Opener
LiftMaster – YouTube Channel for How-To Videos
Troubleshooting Guides on YouTube for LiftMaster Garage Door Openers & Accessories – View Playlist
LiftMaster Garage Door Opener Maintenance Basics on YouTube – View Playlist


Genie Garage Door Opener
Genie Company – YouTube Channel
Garage Door Opener Accessory & HomeLink Programming Videos on YouTube – View Playlist
DoorLink Garage Doors
Short Recessed Panel Garage Door (420/421) – DoorLink Manufacturing, Inc. (doorlinkmfg.com)
Northwest Door Garage Doors
Therma Elite™ – Northwest Door (nwdusa.com)
500 Series – Northwest Door (nwdusa.com)
CHI Overhead Doors
C.H.I. Overhead Doors – YouTube Channel
Maintaining Your Garage Door on YouTube – View Playlist
HUMIDIFIER
We have two different humidifiers in our homes (DS25 is phasing out for the 5500):
General Aire 5500
Click to Download PDF File
![]()
General Aire DS25
Click to Download PDF File
![]()
DS25 Steam Humidifier – Steam Humidifiers – Humidifiers (generalaireparts.com)
HVAC
There are many attributes that, added together, equal a comfortable home. One of the basics is proper heating, ventilation, and air conditioning (HVAC). Your HVAC system is full of parts and pieces that must be maintained to function correctly. We suggest you consider a maintenance subscription plan with Legends Mechanical (legendsmechanical.com) to keep your system running at its best. Here are a few quick ideas to keep your system running great in-between visits by your service tech.
Preventive Maintenance – Seasonal and Monthly
Trane® Residential | Home Air Conditioning & Heating | HVAC Systems
Carrier Residential | Heating & Cooling Basics | HVAC Resources
Air Filters
One of the easiest air conditioner preventative maintenance tasks you can perform yourself is to clean or replace your system’s air filter. The air filter for your AC system will be located in or near your indoor unit. The filter should be cleaned or replaced periodically, whether it is a basic 1-inch filter, a larger, 4-inch media filter, or a more sophisticated electronic air cleaner or purifier. These air conditioner filters can help indoor air quality by removing airborne particles and pollutants from your home. They can also help keep your system operating at its peak performance by reducing the buildup of dust, dirt, and other particles from accumulating on internal components like the blower motor.
The How & Why of Changing Furnace Filters
Heat Loss
1. Verify the furnace filter is installed correctly and does not need to be changed.
2. The thermostat temperature setting and switches are set properly.
3. The ON/OFF switch on the furnace is not switched OFF; see manufacturer’s book for location.
4. The gas valve(s) on the furnace has not been shut OFF.
5. The breaker on the electrical panel has not tripped.
6. Ensure the front panel (fan cover) fully engages the safety switch.
Troubleshooting A Furnace | Furnace Troubleshooting | Carrier
Air Conditioning Loss
1. Verify the furnace filter is installed correctly and does not need to be changed.
2. The thermostat temperature setting and switches are set properly.
3. The ON/OFF switch on the furnace is not switched OFF; see manufacturer’s book for location.
4. The gas valve(s) on the furnace has not been shut OFF.
5. The breaker on the electrical panel has not tripped.
6. The electrical disconnect, located on the home’s exterior wall near the compressor, is ON.
7. Ensure the front panel (fan cover) fully engages the safety switch.
Troubleshoot an Air Conditioner | AC Troubleshooting | Carrier
HVAC Warranties
Trane® Residential | Warranty Types and Terms | What’s covered in my warranty?
LANDSCAPING
Sprinkler Clock Settings – New Sod and Plants
New sod and plants have no root system. The sprinkler system is set up to remedy this situation. For approximately 2-3 weeks from the installation of the new material, follow the sprinkler run times below. Once the new material has been rooted, the water must be cut back to avoid the damaging effects of excessive water.
To determine if the new sod is rooted, gently pull up a section of grass. It is not rooted if you can lift to see the bottom side of the sod, the grass enough. Perform this test once a week until the sod is rooted.
Program A (Lawn Areas)
Lawn popup sprinkler zones – 2 to 3 minutes, 2 to 3 times a day
Lawn rotor zones – 5 to 7 minutes, 2 to 3 times a day
Program B (Trees, shrubs, and ground cover in Planter Beds)
Drip Line Beds – 45 to 65 minutes, 2 to 3 times a day
Sprinkler Clock Settings – Established Sod and Plants
After the first year, the lawn zones should be set to every other day in accordance with your HOA watering schedule.
Program A (Lawn Areas)
Lawn pop-up zones – 9 to 10 minutes every other day, four days per week
Lawn rotor zones – 15 to 20 minutes every other day, four days per week
Program B (Trees, Shrubs, and ground cover in Planter Beds)
Drip line beds – 45 to 65 minutes every other day, four days per week
Zones should be organized on the sprinkler clock timer as follows:
Grass zones set up on ‘program A.’
Planter beds (rock areas) setup on ‘program B.’
**All sprinkler zone run times should be evaluated and adjusted weekly according to current temperatures. More water is needed in warmer temperatures. Less water in cooler temperatures**
Hunter X-Core Programming Overview and Setting Up Program A
Hunter Pro C Programming
Pro C Owners Manual
Click to Download PDF File
![]()
Pro C Specifications Document
Click to Download PDF File
![]()
Mowing
It is important to remember that once the landscaping is installed, stay off it for 2 to 3 weeks, pets included. During these first few weeks, the yard will be extremely soft; walking on it will create divots and ruts that may not come out.
After the first few weeks, the grass will become long and shaggy; this is a good indicator that the sod has rooted in and is now ready for its first mowing. It is important to turn off your sprinkler system for 2-3 days, depending on the weather, before your first mowing. You will want to ensure the ground is firm enough so the lawn mower will not create ruts and wheel tracks in your yard.
Set your lawn mower to mow the grass tall the first few mowing’s. Then lower your lawn mower a little each mowing until you reach your desired grass length. If you mow your lawn too short, the grass can flash and sunburn.
Fertilizing
When driving through a community, one can usually tell which lawns get regular feedings and which do not. Getting on a regular fertilization program that includes at least three feedings per growing season is important. This would include a springtime fertilizer ‘start-up,’ which helps to wake up the lawn and plants; a summertime maintainer, which keeps the roots growing deeper for water; and a winter application, which keeps the lawn greener longer into the fall and early spring.
Sprinkler Filters
Cleaning the filters in your sprinkler system is a critical step in maintaining your system. Clogged filters can lead to individual sprinkler failure, drip system failure, or complete sprinkler system failures if a sprinkler or sprinkler zone seems not to be working correctly or has low pressure, almost always due to clogged filters. There are three types of filters on your system.
Main Line Filter (Clean at least two times a year)
Sprinkler Head Filters (Clean at least one time a year)
Sprinkler Control and Valve Boxes Diagram
Click to Download PDF File
![]()
Rotor Series: Cleaning a Filter on Rotor
Hunter Spray Adjustments and Maintenance
Drip Line Valve Filters (Clean at least two times a year)
Adjusting Sprinkler Coverage
Rotor Heads
MP Rotor Heads
Pop Up Heads
Drip Lines
Sprinkler System – Fall Winterization (Blowout)
It is required to winterize your sprinkler system every fall before freezing temperatures set in. The winterization is a compressed air blowout of the sprinkler lines and valves. This is done to remove the water from your sprinkler system. Removing the water will protect your sprinkler lines from freezing and cracking. We recommend hiring a trained professional to winterize your sprinkler system. Many things can go wrong, which may be quite costly. Should you decide to take these tasks on yourself, educate yourself first on all that is required to have a successful fall winterization. Your sprinkler system warranty does not cover freezing damage, puncture of pipes, or damaged sprinkler heads from improper winterization.
Sprinkler Water
Pressurized Irrigation
In the Treasure Valley, irrigation water is diverted from the Boise River and distributed by large irrigation canals and smaller irrigation laterals to local neighborhoods throughout the city. Pressurized irrigation water (sprinkler system water) is not water from the drinking water system. Pressurized irrigation water is not potable water and should not be consumed. It is completely separate from the drinking water system.
Pressurized irrigation water is usually available around mid-April to mid-Oct. Handling your live plant materials may be necessary if temperatures warm up or remain warm when pressurized irrigation water is unavailable.
Back Flow Sprinkler System
In your area, the sprinkler system may be connected directly to the water on your house. This is great as you control when the water for your sprinkler system turns on and off for the year. It is essential, however, to monitor nightly temperatures at the first and end of the watering season, as freezing temperatures can quickly cause water in the sprinkler system to freeze and damage or even break the sprinkler lines and parts. If the forecast calls for cold temperatures, either don’t turn on the sprinklers yet, or it’s time to get them winterized, depending on the time of year.
When it is time for your sprinkler system to be winterized, we recommend using a landscaping professional who is also familiar with water backflow devices. The backflow device connects your house water to your sprinkler system and is a key component of the system. If the backflow is not winterized properly, your sprinkler system will probably need costly repairs the following spring to make it operational.
Sprinkler System Warranty
Your sprinkler system carries a One-Year warranty against faulty parts or workmanship. However, this does not cover frost damage from improper winterization, puncture of pipes, damaged sprinkler heads, sprinkler adjustments, or periodic maintenance items.
Live Material Warranty
Live landscaping material is a living organism and must be taken care of daily. Proper care includes fertilizing periodically and not over-watering or under-watering live material. After closing on the home, there is no warranty on live landscaping material. It is the homeowner’s responsibility to provide proper care for live landscaping materials.
PLUMBING
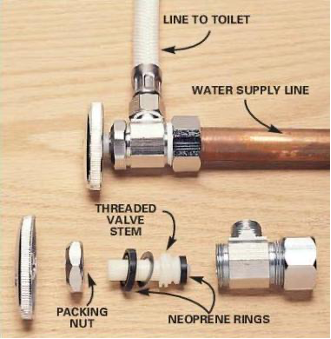
Water Line Shut Off
Sinks
Behind every sink is a hot water and a cold water shut-off valve. If a leak occurs between the shut-off valve and the faucet, these are the valves you will close to stop the water from leaking. Turn the faucet clockwise until the valve closes to shut off the water to the sink.
Toilets
Behind every toilet is a cold water shut-off valve. If a leak occurs between the toilet shut-off valve and the toilet, shut off this valve to stop the water. Turn the faucet clockwise until the valve is fully closed to shut the water off to the toilet.
Water Heater
Behind the water heater is a shut-off valve. If the water heater or any connection to it is leaking, shut this valve off to shut the water off to the water heater. Please note it may be necessary to drain the water heater depending on where the leak occurs. For more information, please consult your water heater owner’s manual.
Main Water Line
All of the water to the house comes in through the main water line. In the event of a leak that cannot be localized by one of the other shut-off valves, it may be necessary to shut the water off to the entire home. This water shut-off valve can be found directly under the crawlspace opening.
Sink and Toilet Shut Off Valve
Water Heater / Main Water Line Shut Off Valve
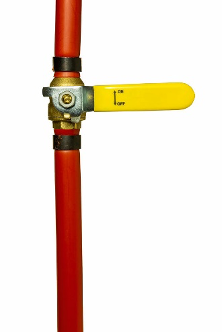
Water Heater / Main Water Line Shut Off Valve
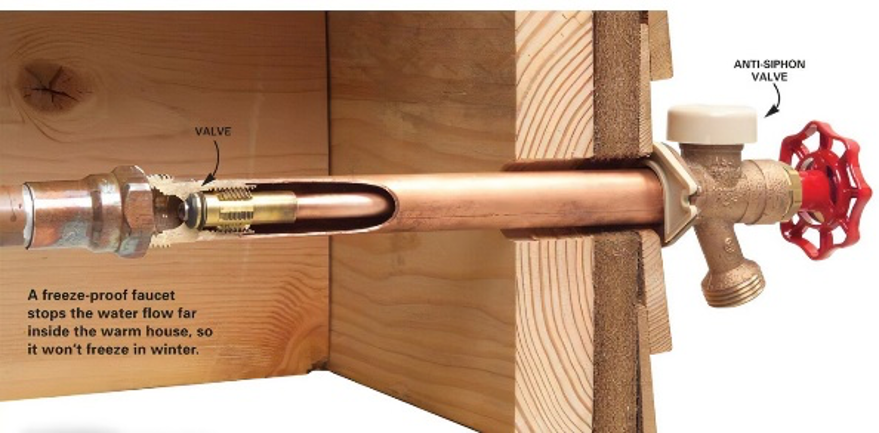
Your exterior hose fixtures do not need to be winterized. To prepare for freezing temperatures, all you need to do is remove your hose from the fixture.
***Your hose must be removed from the fixture for the anti-freeze hose spigot to function correctly. Your hose spigot can crack if the hose is not removed***
Garbage Disposal
Grind food pieces with a flow of cold water.
Disposing of small amounts of fats and grease with the disposal on and a high flow of cold water is fine.
For cleaning, allow the disposal to run for 25 seconds after grinding is done (with a high flow of cold water).
FAQs, Troubleshooting, Care & Cleaning, Video Tutorials, and Owners Manuals
InSinkErator Garbage Disposal Installation and Troubleshooting | InSinkErator US
Evergrind E101 Disposal
Click to Download PDF File
![]()
Garbage Disposal Air Switch
Click to Download PDF File
![]()
Air Switch Spec Sheet
Click to Download PDF File
![]()
Gas Water Heater
• If your water is not hot, read the manufacturer’s manual and check the pilot light on the water heater. If it is not lit, refer to the instructions in the owner’s manual before requesting a warranty repair.
Bradford White Troubleshooting Manual
Click to Download PDF File
![]()
Bradford White Water Heater Registration & Warranty Coverage
Welcome to Bradford White Warranty Center
Toilets/Water Closets
Using a bowl cleaner in the toilet tank is not recommended, as the rubber flapper may become warped.
Do not use any abrasive cleaners on the toilet seat.
Water-saving toilets are used in your home, so slow-flushing toilets are not a warranty issue.
Care & Cleaning | Kitchen | Bathroom | KOHLER
Warranty Calls
For non-emergency customer care services, please email the Brighton Warranty Department at warranty@brightoncorp.com. Please include the name of your community, address, close date, and best phone numbers. Please provide a brief description of the work requested and its location in your home. For example, please indicate the room, the location in the room, and a general description of the problem. If possible, please attach any relevant photos. A picture is worth a thousand words.
For the first 30 days after you close on your home, we will adjust the plumbing systems as necessary to correct dripping faucets, clogged drains, running toilets, and similar issues.
For two years, we warrant that the plumbing systems will be free from construction defects.
Plumbing Emergencies
In the event of an emergency occurring during regular business hours, please get in touch with Brighton Homes Warranty Department at 208-287-0344 or email the warranty department at warranty@brightoncorp.com.
In the event of an emergency that occurs after regular business hours or on weekends, it is your responsibility to contact Shilo Plumbing at 208-941-7431.
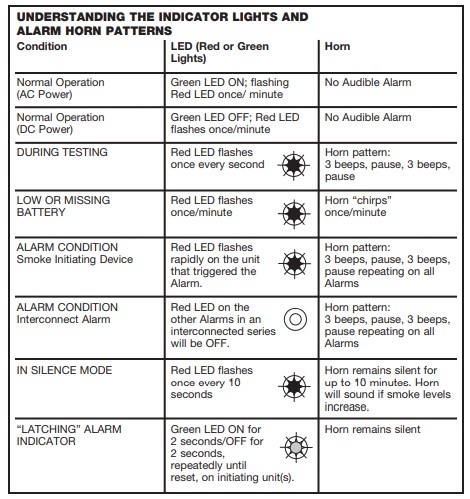
SMOKE/CO DETECTORS
Testing and Changing Your Smoke/Carbon Monoxide Alarm Batteries
You should test your alarms at least once a month to ensure they are working correctly and replace the batteries every six months. The detector should be replaced seven years after the manufacture date on the back of the alarm.
Signs You Need to Replace the Batteries
You’ll likely notice a high-pitched chirping noise when it is time for the batteries to be changed. It is best to be proactive and change the batteries in your smoke detectors before that noise occurs.
Different Types of Beeps and Chirps
4 Beeps and a Pause: EMERGENCY. This means that carbon monoxide has been detected in the area – you should move to fresh air and call 9-1-1.
1 Beep Every Minute: Low Battery. It is time to replace the batteries.
5 Beeps Every Minute: End of Life. This type of chirp indicates it is time to replace the unit.
Product Manuals / How to Change Your Batteries
1. Check the back of one of your alarms for the model number.
2. Follow this link to: Smoke Detectors | CO Alarms | Smoke and Carbon Monoxide Alarms
3. Select the model and click on the photo.
4. Scroll down to “Product Manuals” and click on the link.
THERMOSTAT
Your WiFi-enabled thermostat will allow you to set schedules, adjust temperatures remotely, and track your energy use. This will help you to keep your house comfortable and energy efficient. For information on setting up your thermostat, find your thermostat and follow the links below.
Honeywell Vision Pro 8000
Wi-Fi VisionPRO 8000 Thermostat – Smart Energy | Honeywell Home
Honeywell Home – YouTube Channel
Honeywell Vision Pro 8000 User Manual
Click to Download PDF File
![]()
Honeywell Vision PRO 8000 Quick Reference
Click to Download PDF File
![]()
Honeywell Lyric T6 Pro Wi-Fi, Programmable
Lyric T6 Pro Wi-Fi Thermostat | Honeywell Home
Honeywell Home – YouTube Channel
Honeywell T6 LyricPro User Manual
Click to Download PDF File
![]()
Venstar ColorTouch T7900 Wi-Fi Capability, Humidity Control, Programmable
Venstar ColorTouch 2016 Overview Video
Venstar – YouTube Channel
Venstar – support and troubleshooting page.
Venstar ColorTouch T7900 User Manual
Click to Download PDF File
![]()
WINDOWS
Every morning you wake up and look through your windows, but have you ever thought about the condition of the frame and glass? We often take our windows for granted, but if you want them to last, you must take proper care of them. Here are some tips for cleaning and maintaining your windows.
Care and Maintenance for Casement, Awning, and Gliding Windows | Andersen Windows
Window Cleaning Tips – Renewal by Andersen Window Care Videos
Don’t scratch your glass! Before you begin, it is important that you first remove the built-up dust on your windows to ensure you do not scratch the glass when applying pressure.
Be careful with home window cleaners. Strong window cleaning solutions can damage paintwork and the vinyl surrounding your window, so be very cautious when handling these window cleaners.
Use a squeegee. Remove the water from your window with a clean, dry squeegee blade. It is important to make sure your squeegee is always kept dry to prevent it from smearing the glass.
Hire a trusted professional. Hiring a trusted professional will ensure that your windows are cleaned every time. It will also save you the time and stress of cleaning your own windows.
Window Warranty
Anderson Windows Limited Warranty
Click to Download PDF File
![]()
Prime Limited Lifetime Warranty
Click to Download PDF File
![]()
Window Condensation
Some people refer to window condensation as sweaty glass, but the phenomenon doesn’t have much to do with the glass itself. Condensation is caused by humidity in the room air, and the reason it turns to fog and water droplets on the window is merely because the glass is colder than the rest of the room.
Renewal by Andersen Condensation Brochure
Click to Download PDF File
![]()
Seasonal Checklists
We are proud of the homes and neighborhoods in which we build. We strive to create long-lasting value in our communities. This cannot be achieved unless our homeowners properly maintain their homes. Periodic maintenance is necessary because of normal wear and tear, inherent characteristics of the materials used in your home, and normal service required by the mechanical systems.
 Spring
- Test Smoke Alarms (Monthly) and Change Smoke Alarm Batteries
- Test and Reset All GFCI’s (Monthly)
- Clean and Change Furnace Filter (Quarterly) – Consider a Subscription From the Filter Factory
- Check Fridge for Expired Food Items
- Air Conditioning Maintenance (Early in Spring) – Consider a Subscription Service From Legends Mechanical (Legendsmechanical.com)
- Turn Off Fireplace Pilot Light (When Weather Warms)
- Inspect Drainage
- Clean Gutters
- Have Your Sprinkler System Professionally Turned on When Irrigation Water is on (usually in April); Grass Zones are set up on Program A and Planter Beds (rock areas) are set up on Program B
- Consider Signing up for Zamzow’s Lawn Program (Zamzows.com) for Regular Fertilization
 Summer
- Test Smoke Alarms (Monthly)
- Test and Reset All GFCI’s (Monthly)
- Clean and Change Furnace Filter (Quarterly)- Consider a Subscription From the Filter Factory
- Touch up Caulk and Grout
- Inspect Interior Paint or Stain
- Seal Concrete Cracks
- Clean Window Weep Holes
- Check Fencing for Needed Staining or Repairs
- Inspect Crawlspace for Any Issues – Consider Signing up for Best Pest Control and Services (208) 362-5802
 Fall
Fall
- Test Smoke Alarms (Monthly) and Change Smoke Alarm Batteries
- Test and Reset All GCFI’s (Monthly)
- Replenish Sock Drawer
- Clean and Change Furnace Filter (Quarterly) – Consider a Subscription From the Filter Factory
- Furnace Maintenance (early in Fall) – Consider a Subscription Service From Legends Mechanical (Legendsmechanical.com)
- Turn on Fireplace Pilot Light (Early Fall When Weather Becomes Cooler)
- Have Your Sprinkler System Professionally Blown Out When Irrigation Water is Shut Off (Usually October)
- Lube Garage Overhead Door and Tighten Bolts
- Check Pressure Relief Valve on Water Heater
 Winter
- Test Smoke Alarms (Monthly)
- Test and Reset All GFCI’s (Monthly)
- Clean and Change Furnace Filter (Quarterly)- Consider a Subscription From the Filter Factory
- Touch up Caulk and Grout
- Inspect Interior Paint or Stain
- Seal Concrete Cracks
- Clean Window Weep Holes
- Check Fencing for Needed Staining or Repairs
- Inspect Crawlspace for Any Issues – Consider Signing up for Best Pest Control and Services (208) 362-5802
stay in the know
From home design tips to new industry standards, we’ve got you covered.


 © 2025 Brighton | All Rights Reserved. | Privacy policy | 208.908.7533 | 2929 W. Navigator Drive Suite 400 Meridian, Idaho 83642